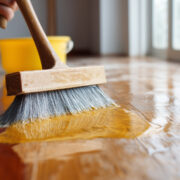
It’s a scenario familiar to almost every home cook: a slippery bottle, a moment of distraction, and suddenly a golden puddle of cooking oil is spreading across the kitchen floor. An oil spill is more than just a simple mess; it’s a stubborn, slick hazard that can be difficult to clean and poses a serious risk for slips and falls. Wiping it with a wet cloth or a standard mop will only smear the grease, creating an even larger and more treacherous problem.
Fortunately, with the right technique and a few common household items, you can completely remove an oil spill, eliminate the slippery residue, and restore safety to your kitchen. This guide provides a step-by-step process for tackling any cooking oil spill effectively, regardless of your floor type.
Immediate Action: Safety and Containment Are Your First Priority
Before you even think about cleaning, your first priority must be safety. An oil-covered floor is incredibly slippery, and the immediate goal is to prevent any accidents.
- Secure the Area: As soon as the spill happens, stop what you are doing and ensure no one walks through the area. Keep pets and family members, especially children, out of the kitchen until the floor is completely clean and dry.
- Do Not Use Water: Your first instinct might be to grab a wet mop or paper towels, but this will only make the situation worse. Oil and water do not mix; adding water will cause the oil to spread over a wider surface area, expanding the danger zone.
- Act Quickly: While you shouldn’t rush in a way that compromises safety, it is important to address the spill promptly. The longer oil sits, the more likely it is to seep into porous surfaces like grout lines or unsealed tile, potentially leaving a lasting stain.
The Absorption Method: Your Most Crucial First Step
The key to effectively removing an oil spill is to lift the oil off the floor, not smear it around. The best way to do this is by using a highly absorbent substance to soak up the bulk of the liquid.
What You’ll Need:
- Baking soda, cornstarch, flour, table salt, or clay-based cat litter.
- A dustpan and a soft-bristled brush or a plastic spatula.
Step-by-Step Instructions:
- Cover the Spill Generously: Without stepping in the oil, pour your chosen absorbent material directly onto the spill. Be generous—you want to create a thick layer that completely covers the entire puddle.
- Let It Sit and Absorb: Allow the powder to sit undisturbed for at least 15 to 30 minutes. For very large spills, you may want to give it up to an hour. You will notice the powder beginning to clump and darken as it soaks up the oil.
- Carefully Remove the Powder: Once the powder has absorbed the oil, use a soft brush and dustpan or a plastic spatula to carefully scrape up the oily mixture. Avoid using a stiff broom, as it can flick the oily powder around. Dispose of the clumped material in the trash.
Removing the Oily Residue: Degreasing the Surface
After removing the absorbed oil, you will still be left with a thin, greasy, and slippery film. The next phase is to cut through this residue to get your floor truly clean.
What You’ll Need:
- A high-quality, grease-cutting dish soap.
- A bucket of very hot water.
- A sponge, microfiber cloth, or stiff-bristled scrub brush (use a softer brush for delicate floors like hardwood or marble).
Step-by-Step Instructions:
- Create a Soapy Solution: Fill your bucket with hot water (as hot as you can safely handle with gloves) and add a few generous squirts of degreasing dish soap. Swish it around to create a sudsy solution.
- Scrub the Affected Area: Dip your sponge or brush into the hot, soapy water and scrub the entire area where the spill occurred. Apply firm pressure and work in circular motions to break down the remaining oily film. You should see the greasy sheen begin to disappear.
- Rinse Your Tool Frequently: Rinse your sponge or brush in the bucket often to avoid spreading the grease you’ve just lifted. For larger spills, you may need to change out the soapy water if it becomes too oily.
Rinsing and Drying for a Flawless, Non-Slip Finish
This final step is essential for removing any lingering soap residue, which can also be slippery if left on the floor.
- Rinse with Clean Water: Empty your bucket and refill it with clean, plain warm water. Using a clean cloth or a clean mop head, go over the entire area again to rinse away all the soap suds.
- Dry the Floor Completely: Do not let the area air-dry. Use a clean, dry towel or microfiber cloth to wipe the floor until it is completely dry to the touch. This prevents water spots and ensures all slipperiness is gone.
- Perform a Safety Check: Once dry, carefully test the spot with your shoe to confirm that no greasy residue remains. It should feel as clean and slip-free as the rest of your kitchen floor.
Advanced Tools and Long-Term Prevention
For exceptionally large or stubborn spills, a wet dry vacuum designed for hard floors can be a powerful ally. After absorbing the bulk of the oil, you can use this machine to wash the area with a cleaning solution and immediately suction up the dirty, oily water, ensuring a deep and thorough clean with minimal residue.
To make future cleanups easier, focus on consistent floor maintenance. A floor that is already clean is easier to manage when accidents happen. Running a robot vacuum daily can keep dust and grit from accumulating, which prevents those particles from mixing with a fresh oil spill and turning it into a sludgy, more difficult mess.
By following these steps, you can confidently and safely handle any kitchen oil spill, protecting your floors and your family.